Grafting fruit trees date back as early as 1,000 B.C. In fact, history reveals that the Romans, Chinese, and Greeks understood grafting as a means to preserve the superior traits of a plant or tree.
Fast forward to today, and we have various techniques developed used for grafting fruit trees, which we’ll discuss throughout this article.
More importantly, we’ll share with you a step-by-step guide on how to graft trees. But first, let’s define tree grafting and its significance in a modern world.
What Is Tree Grafting?
Grafting is the process of joining together the parts of 2 plants to form a new tree and function as a single plant.
One plant serves the role of providing the root system, also known as the rootstock.
The other plant provides the upper section with desirable traits or characteristics (flowers or fruit), which is also known as the scion.
The way it works is by attaching the scion to the root stock to form a new tree. Tree grafting can also be referred to as tree surgery; however, don’t let the term “surgery” scare you.
Grafting is a fairly straightforward process, and you simply need the essential tools to help you produce the quality you desire.
The Benefits of Grafting Fruit Trees
Let’s say you plant an apple tree that produces excellent, luscious-tasting apples. You know that it won’t be long before that apple tree runs out of apples to give.
So what do you do? You might buy more seeds to grow more apple trees and re-create that superior quality.
However, there’s no guarantee you’ll get the same quality. Furthermore, you’ll have to wait a considerable amount of time before your new apple trees start to produce fruit again.
This is where grafted trees come in. Grafting helps you preserve that superior quality by creating exact genetic duplicates of the plant. These are just some of the benefits grafting has to offer.
This doesn’t just apply to apple trees. If you want to create exact replicas of a superior cherry or pecan tree, you can do so with grafting!
Finally, grafted trees will bloom much faster than propagating through seeds or cuttings.
Grafted Trees: How to Graft Fruit Trees Step-by-Step
Now that we understand the significance of grafting, let’s dive into how to graft your favorite, superior tree.
Materials You’ll Need
Before we get started, you’ll need the right tools, such as:
- Grafting knife or utility knife
- Grafting tape
- Budding knife
- Pruning shears
- Bud stick or dormant scion
- Fine tooth saw
- Light hammer
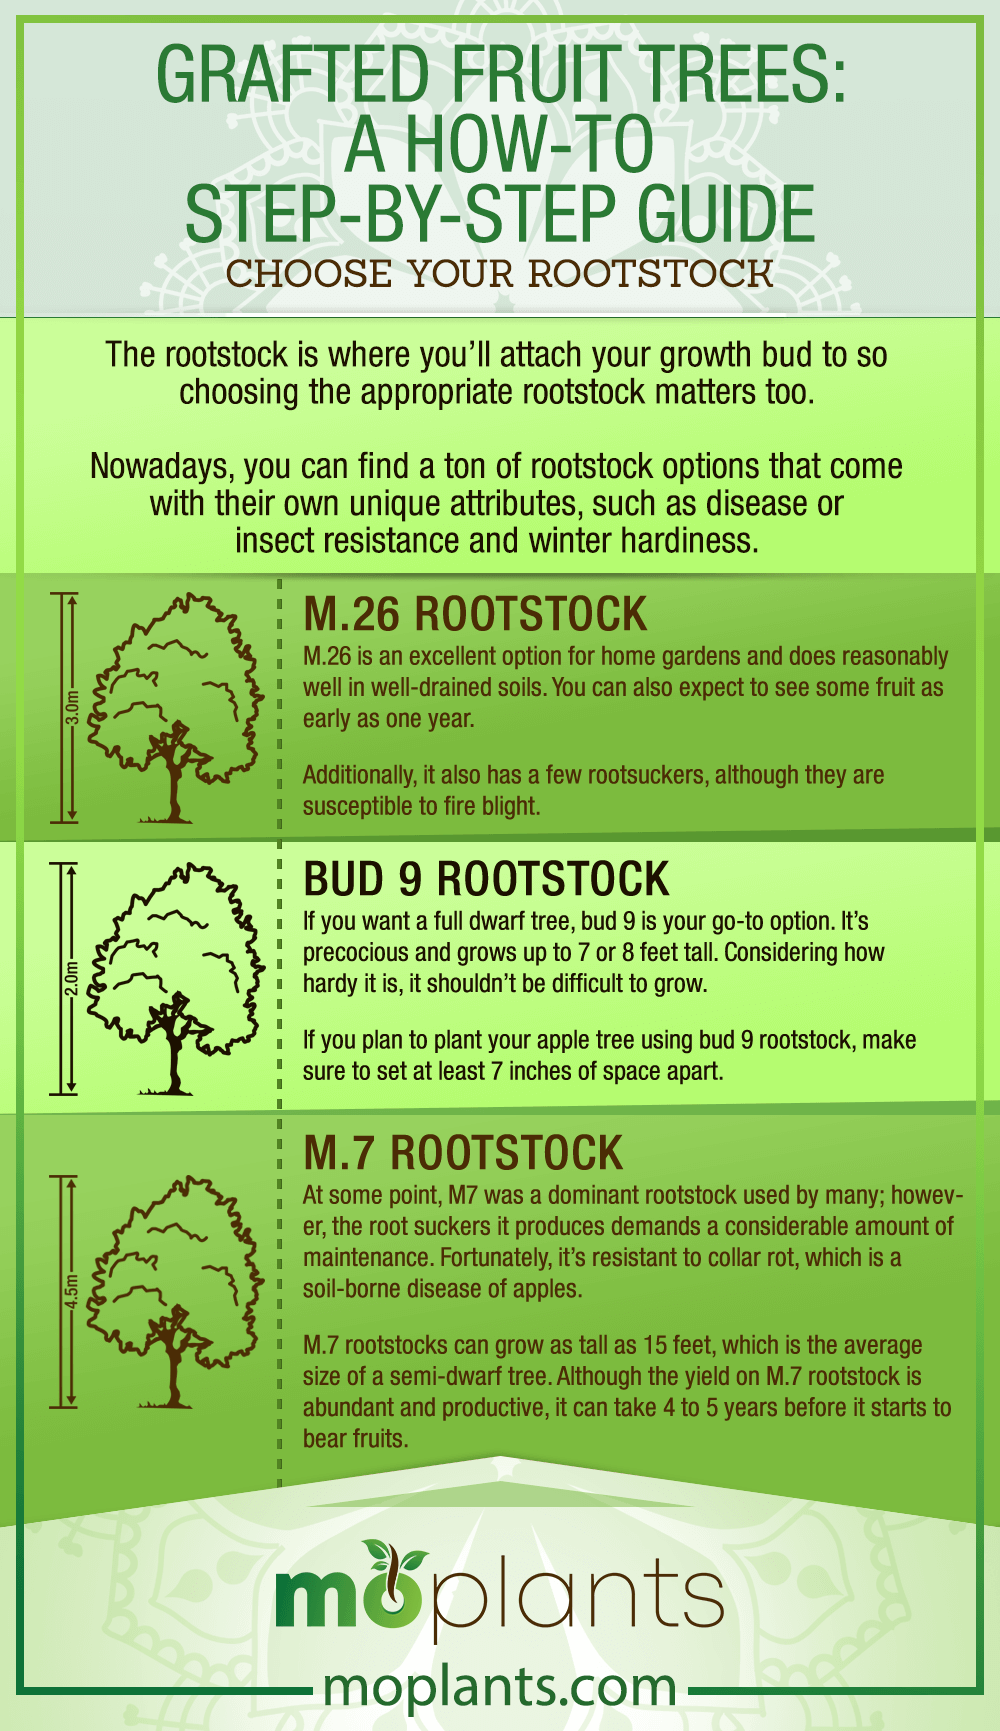
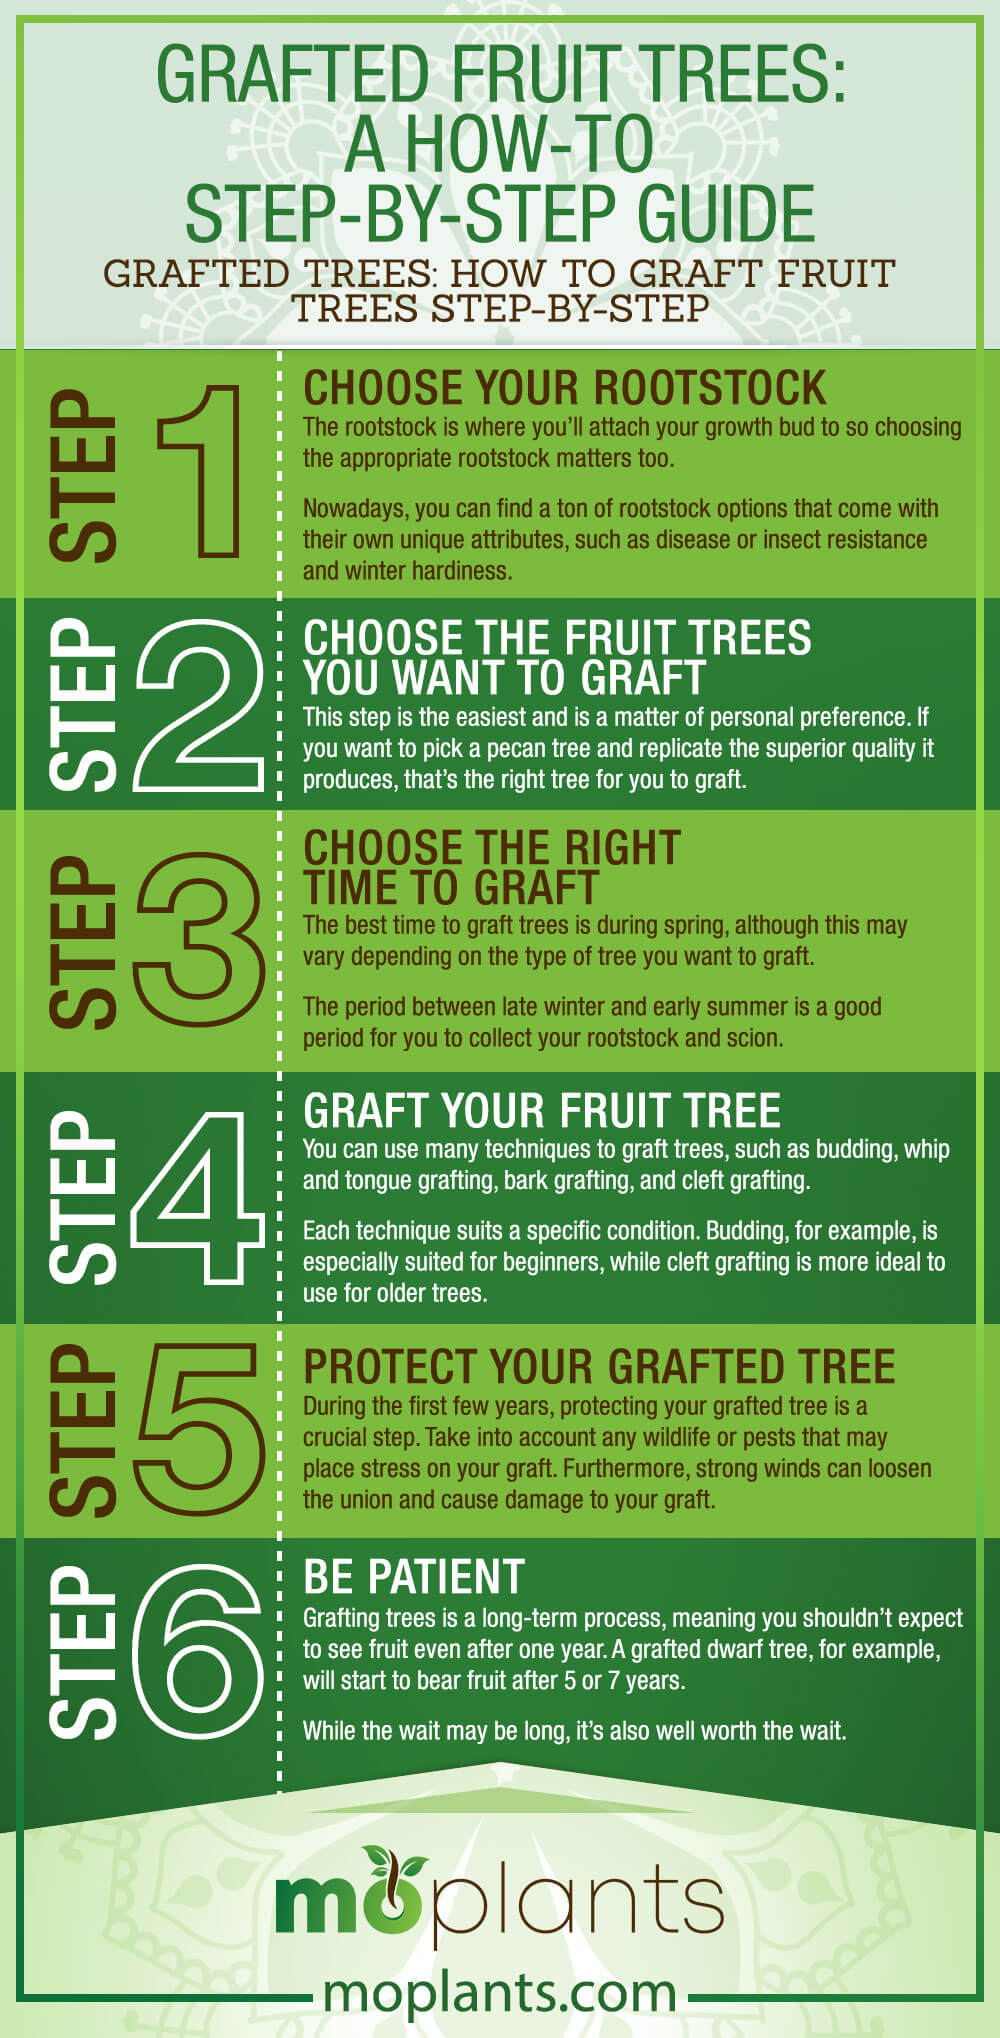
Step 1: Choose Your Rootstock
The rootstock is where you’ll attach your growth bud to so choosing the appropriate rootstock matters too.
Nowadays, you can find a ton of rootstock options that come with their own unique attributes, such as disease or insect resistance and winter hardiness.
Some rootstocks worth mentioning include:
M.26 Rootstock
M.26 is an excellent option for home gardens and does reasonably well in well-drained soils. You can also expect to see some fruit as early as one year.
Additionally, it also has a few rootsuckers, although they are susceptible to fire blight.
If you plan to use M.26 as your rootstock, make sure you plant the graft union by an inch above the ground to expose less of the rootstock and at least 8 inches apart from each other.
Bud 9 Rootstock
If you want a full dwarf tree, bud 9 is your go-to option. It’s precocious and grows up to 7 or 8 feet tall. Considering how hardy it is, it shouldn’t be difficult to grow.
If you plan to plant your apple tree using bud 9 rootstock, make sure to set at least 7 inches of space apart.
M.7 Rootstock
At some point, M7 was a dominant rootstock used by many; however, the root suckers it produces demands a considerable amount of maintenance. Fortunately, it’s resistant to collar rot, which is a soil-borne disease of apples.
M.7 rootstocks can grow as tall as 15 feet, which is the average size of a semi-dwarf tree. Although the yield on M.7 rootstock is abundant and productive, it can take 4 to 5 years before it starts to bear fruits.
Infographic
Step 2: Choose the Fruit Trees You Want to Graft
This step is the easiest and is a matter of personal preference. If you want to pick a pecan tree and replicate the superior quality it produces, that’s the right tree for you to graft.
If you prefer a plum tree, that’s fine too. Again, it’s a matter of personal preference, so choose any tree you want to graft and proceed to step 3.
Step 3: Choose the Right Time to Graft
The best time to graft trees is during spring, although this may vary depending on the type of tree you want to graft.
The period between late winter and early summer is a good period for you to collect your rootstock and scion.
Make sure to collect scion with 3 or 4 buds in them. 1/4 to 3/8 inches in diameter is an adequate measurement to go by when harvesting your scion.
Step 4: Graft Your Fruit Tree
You can use many techniques to graft trees, such as budding, whip and tongue grafting, bark grafting, and cleft grafting.
Each technique suits a specific condition. Budding, for example, is especially suited for beginners, while cleft grafting is more ideal to use for older trees.
Let’s go over the steps required for each technique one by one.
Budding
Unlike most grafting techniques, budding or bud grafting is done during late summer. During this period, you can use well-grown buds, and the bark also slips in easily.
Among all techniques, budding is the easiest to learn and best suited to beginners. Here’s how to bud graft:
Step 1: Cut bud sticks from the shoots of your current year’s growth. Mature, healthy buds will have a slightly brown color.
Step 2: Cut the leaves off the bud sticks to minimize any water loss. Make sure to leave at least 1/2 inch of the leafstalk for you to grip and handle.
Step 3: Grab your grafting knife. 1/2 inch underneath the bud and at a 45-degree angle, make a small cut. When cutting, make sure to pull the knife upwards so that you cut into the outer bark and cambium layer without cutting too deep and destroying the heartwood.
Step 4: Make another cut 1/2 inch above the bud. Let the length of your blade guide you downwards until it meets the first cut you made in Step 3.
Step 5: Make a similar or matching cut on your rootstock at the same 45-degree angle. You can use the piece you cut in Steps 3 and 4 to guide you into making a similar cut.
Step 6: Attach the first cut you made in steps 3 and 4 to the cut you made in step 5. The graft union between your bud and the rootstock provides an active layer of growth that will heal the graft once joined.
Step 7: Use grafting tape to attach the bud to the rootstock properly. Ensure you wrap it precisely that the bud attaches firmly to the rootstock cambium layer.
Step 8: Label your graft to make it easier for you to remember the species you grafted or in case you forget the type of bud you grafted onto it.
Step 9: It should take a few weeks until your graft heals. By this time, you can leave the tape on right before spring.
Step 10: Your bud will start to grow the following year. This is when you can cut the rootstock above the graft.
Here’s a video showing how to perform bud grafting as well.
Whip and Tongue Grafting
Whip and tongue grafting is a useful technique to use for smaller trees and is usually done in the spring.
One thing to note about this grafting technique is that when joining the pieces together, the wood must be of equal or similar diameter (about 1/2 inch).
You will also need masking tape along with your grafting tape for this technique to work.
If you have any apple or pear trees growing in your home orchard, you can add multiple varieties through whip and tongue grafting.
Here’s how it’s done:
Step 1: Collect your scion wood and trim any of the leaves to minimize water loss.
Step 2: Grab your rootstock and make your first cut (at least 1.25 to 1.5 inch) above the top root.
Step 3: Make a matching cut on your scion.
Step 4: Grab your rootstock, and starting from about 1/3 inch down from the cut surface of your rootstock, make a cut into the center of your rootstock. Afterward, make a similar cut on your scion as well.
Step 5: Join your scion and rootstock together. Make sure both are firmly attached for a secure fit.
Step 6: Grab your tape, and starting below your newly formed graft union, wrap the tape around the union for an effective seal.
Step 7: Tie the tape together with a knot to complete the sealing process.
Step 8: When planting your newly formed plant, the graft union should be at least 2 inches above the ground to prevent the scion from rotting.
Here’s a video on how to perform this technique:
If you want to learn more about grafting techniques, you can find more here.
You’ll be able to find techniques such as bark grafting, cleft grafting, and other techniques that may prove useful in the future.
Step 5: Protect Your Grafted Tree
During the first few years, protecting your grafted tree is a crucial step. Take into account any wildlife or pests that may place stress on your graft. Furthermore, strong winds can loosen the union and cause damage to your graft.
In that case, here are a few tips we recommend the following:
- Use a protective tree tube.
- Place a large or thick stake beside your grafts and loosely tie the stake to your graft to keep it in place and protect it from windy conditions.
- If you notice a lot of wildlife in your area, you can opt for a wire cage similar to what you would use to protect your vegetables in a garden.
- Water your graft regularly. Also, don’t forget to add fertilizer as needed to ensure the success of your graft’s growth.
Step 6: Be Patient
Grafting trees is a long-term process, meaning you shouldn’t expect to see fruit even after one year. A grafted dwarf tree, for example, will start to bear fruit after 5 or 7 years.
While the wait may be long, it’s also well worth the wait.
Creating exact replicas of superior plants you want to keep in your home orchard, garden, or space is one method that comes with amazing benefits but also requires patience on your end.
Until then, you can graft more trees or even attend a grafting workshop to learn more about how to properly care for your grafts and other methods you can use along the way.
You can start watching grafting workshop videos on Youtube, or you can subscribe to paid plans online. Alternatively, there are a few more you can stream for free on Ncbionetwork.org.
Infographic
Final Words
We hope this article was able to help you understand what grafting is and how to graft trees step-by-step.
We’d also love to hear more about your grafting experiences! Feel free to share them with us below.