You may have enjoyed your side of sweet potato fries at your favorite local restaurant. But what if we tell you that you can enjoy one from your own garden? Or from your very own backyard, homegrown side of sweet potatoes? – Yes, it’s true, and we are about to take you on this journey along with us so that we all can enjoy a healthy serving of our very own homegrown sweet potatoes.
A sweet potato vine can be an incredibly gorgeous addition to have in your home garden, while it is a source of one of the most popularly loved root vegetables – the humble sweet potato. Whether you place it on a trellis, plant it directly in your garden, or even in an indoor container, the beautiful green leaves are surely a fresh, enchanting addition to your garden collectibles.
In addition to being aesthetically pleasing, this plant is a source of a root vegetable that has seen a tremendous popularity surge over the years. With people understanding how starchy foods and carbohydrates work but knowing better than giving up on potatoes, the humble sweet potato is a great alternative. Hence, considering it a regular part of your diet is a great idea.
Packed with vitamins, fiber, and minerals, they are a source of nourishment for your mind and body. They are also loaded with phytonutrients without the belly-enlarging qualities of our regular potato friends. Safe to say, once you start snacking on this healthier cousin of your favorite vegetable, there certainly is no going back.
The Humble yet Versatile Sweet Potato
It is important to understand that sweet potatoes are very different from yams related to grasses and lilies (flowering plants). Moreover, they are also not brothers to our regular white potatoes. In fact, as we suggested earlier, they are more like cousins. Given how white potatoes are from the nightshade family, sweet potato is from the morning glory family.
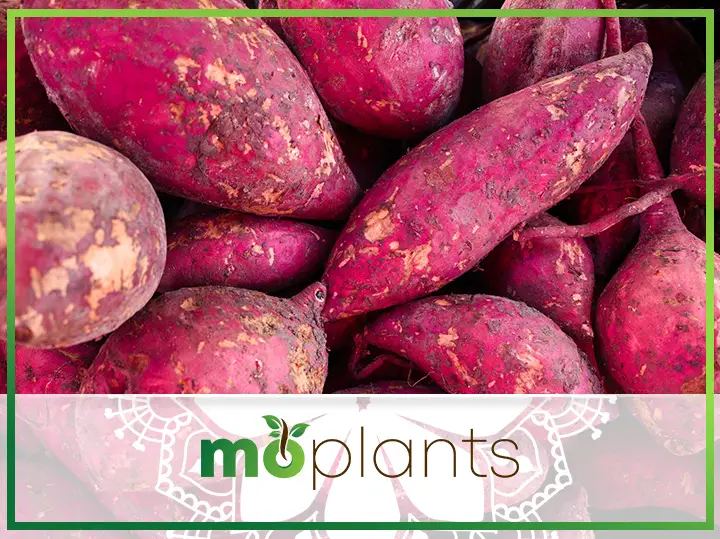
Sweet potatoes are a tropical plant. The edible part of the sweet potato is called tubers, and sweet potatoes are root vegetables much like carrots, turnips, beetroots, etc. The sweet potato has a brightly colored, almost crimson jacket with orange-colored flesh, which gets deeper with every added element of cooking it.
Sweet potatoes are one of the most versatile vegetables there is. There is no end to preparing this healthy and delicious vegetable that you can enjoy however you like, from crisps to mash, fried, steam, and even roasted. They also make for an amazing pie filling, soups, casseroles, and even hearty, starchy goodness for desserts.
While the sweet potato has gained popularity over the years, the vegetable has been around for much longer. Unlike other root vegetables, they can be grown anywhere in warm weather. And thanks to its neutral taste and texture, it suits almost all of the world’s palates and different cuisines. It is one humble vegetable with a multi-faceted usage personality.
Consider the Variety
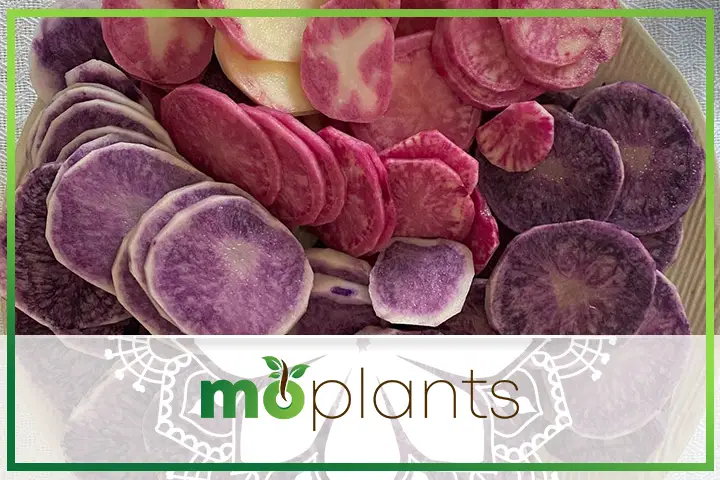
While it is very easy to confuse sweet potatoes with regular potatoes and other root vegetables, it is a shocker that the vegetable itself has many varieties on its own. Typically, we see the orange-flesh type and consider it the only type of sweet potato. But surprisingly, there is a white, yellow, and even a sweet potato type that has purple flesh.
However, it is important to differentiate among the seven different types of sweet potatoes that are just as healthy, delicious, and versatile to have from a botanical perspective. Not to mention, they all have different textures when cooked and different growing time frames. The orange flesh cooks up moist, white and yellow become creamy and purple ones are dry.
Now let’s break down the seven different types of sweet potatoes according to their growth spurts:
Beauregard (90 Days)
Originally from the depths of Louisiana but grows just as well up north. It has dark red roots and typical orange flesh and can be stored well for a long.
Georgia Jet (90 Days)
Perfectly suited for the north-side weather. Has the typical look of a sweet potato with red skin and moist, deep orange flesh. It grows faster than any other type of sweet potato.
Centennial (100 Days)
A popular variety sold in the US. It has carrot-colored good looks with equally great storage life and a northern-side growth spurt.
Jewel (100 Days)
It is more of a copper skin tone and orange flesh of sweet potato – this one is known for its diseases resistance qualities and good storage.
White Yam (100 Days)
Also known as White Triumph, the white skin provides cover for dry white flesh and grows from compact vines. It is one of the oldest known varieties of sweet potatoes.
Vardaman (110 Days)
Great for small backyard gardens as the plant grows like a bush. It carries a unique blend of bluefish, purple foliage, peaking golden skin, and reddish-orange flesh to go with it. A true beauty if you ask us.
Stokes (120 Days)
The purple-colored variety of sweet potatoes carries tremendous health benefits. It cooks deliciously in savory dishes and mashes.
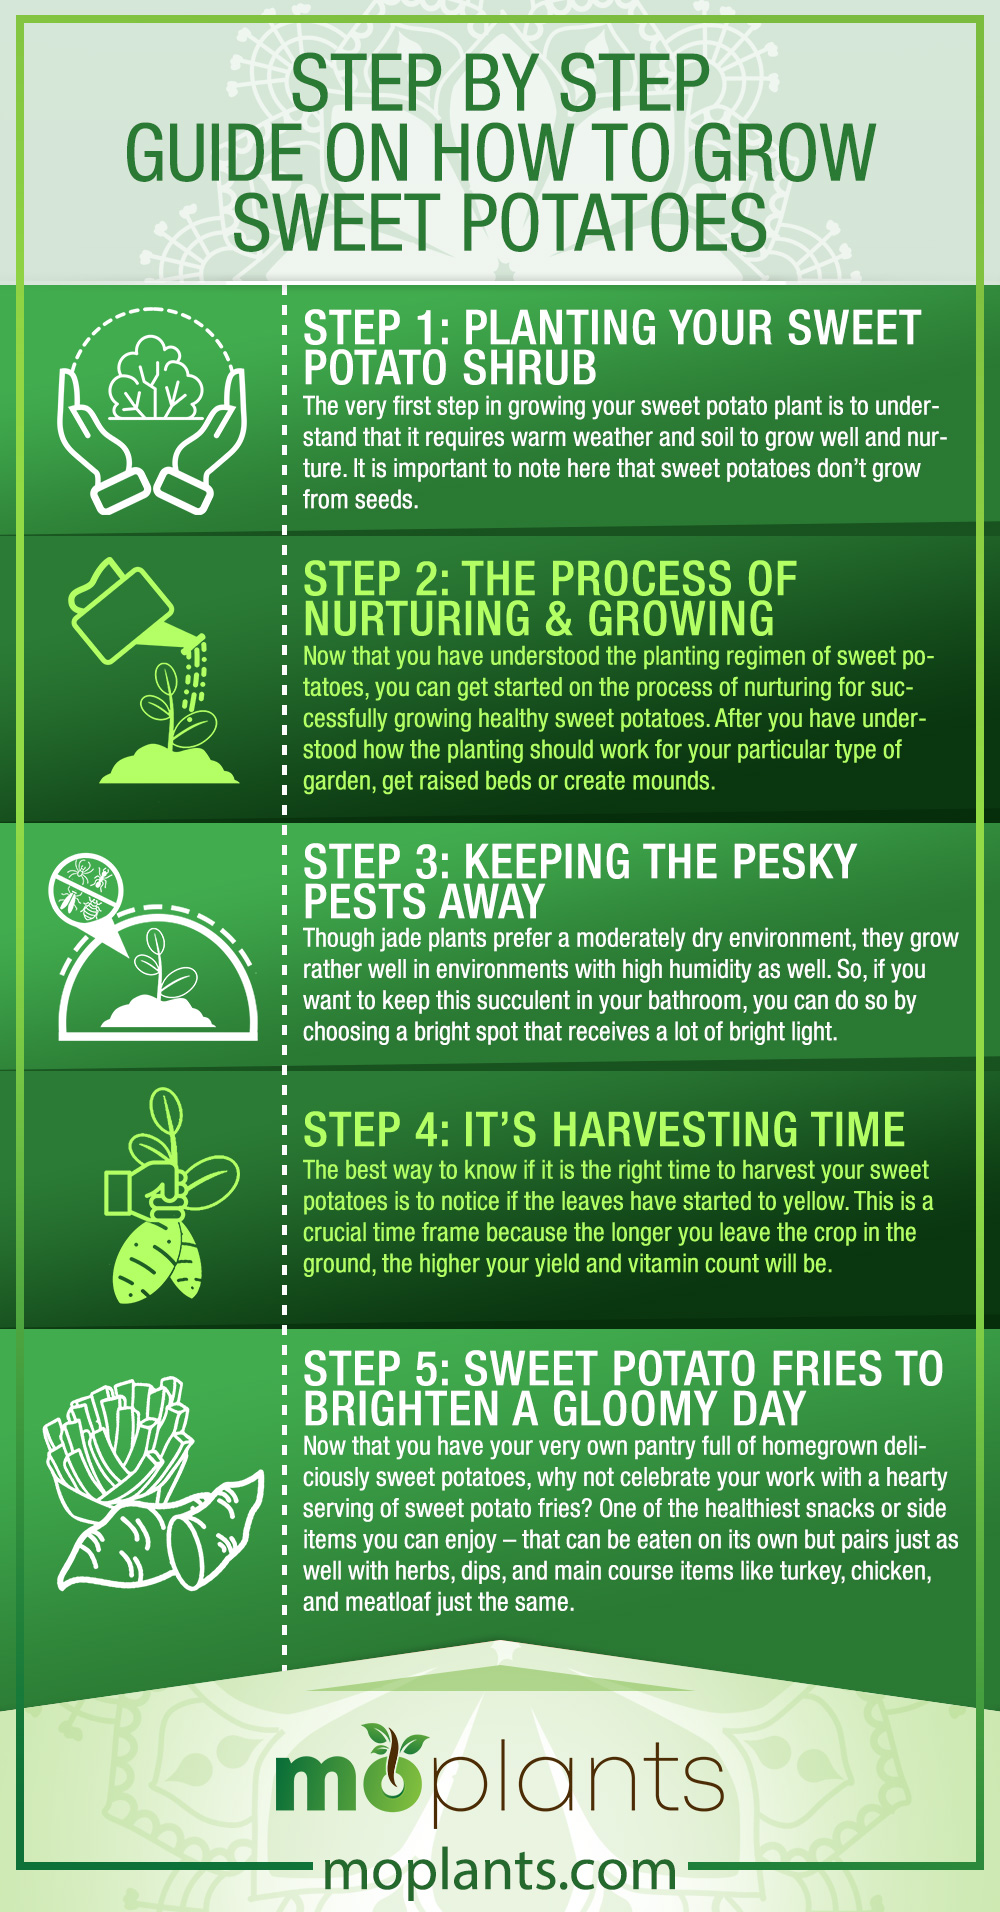
Step 1: Planting Your Sweet Potato Shrub
The very first step in growing your sweet potato plant is to understand that it requires warm weather and soil to grow well and nurture. Even though it does well in northern areas too, it is traditionally a southern crop. But as we learned about the many varieties of sweet potato, it is a given that with the right technique, one can grow the sweet potato anywhere.
It is important to note here that sweet potatoes don’t grow from seeds. Unlike many other plants, they actually require slips and sprouts growing from pre-existing sweet potatoes. You can get one from your local farmer’s market or even online for a retailer. Now that you have all things ready, it is time to start planting.
Firstly, you need to find a nice, sunny spot in your backyard or garden and have the soil well-drained. Even though sweet potatoes aren’t too demanding of a plant, they do like sandier soil for a successful growth spurt. Besides this, they need lots of air space so ensure your garden isn’t too clammed. Otherwise, consider getting raised sweet potato beds.
Now it is time to pour in the compost, mainly perlite or coconut coir should do. This will nicely fertilize the soil. Animal manure is not good for sweet potatoes as it creates stained roots. Also, we don’t recommend nitrogen fertilizers on the heavier side as they promote lush leaf growth but compromise the quality of your sweet potato.
Step 2: The Process of Nurturing & Growing
Now that you have understood the planting regimen of sweet potatoes, you can get started on the process of nurturing for successfully growing healthy sweet potatoes.
Here’s how to do it:
- After you have understood how the planting should work for your particular type of garden, get raised beds or create mounds at least 8 inches tall and 12 inches wide.
- Leave 3 feet of space between mounds to allow space for the vines.
- Make sure it is a warm, overcast day when you plant your sweet potatoes.
- Check the temperature of the soil for it to have reached at least 60° F.
- Break off the lower leaves and let the top ones flourish.
- Set the slips deep in the mounds for the sweet potatoes to form on the nodes.
- Use a high-phosphorus liquid fertilizer blend for watering generously for at least 7 to 10 days.
- Side dressing is part of nurturing the plant that you’ll have to do after 3 to 4 weeks of fertilizing the soil. Sandier soil may take more.
- Starting 2 weeks after planting, you would also have to weed the sweet potato beds.
- Don’t disturb the feeder roots by digging unnecessarily in or around the bed.
- Watering is a key factor here. Mid-summer watering is absolutely essential in dry, hotter weather to increase the yield.
- Don’t try to prune the sweet potato vines and let them be vigorous.
- Reduce watering as the season ends to avoid the cracked skin of the vegetable.
Step 3: Keeping the Pesky Pests Away
Believe it or not, sweet potato plants are a little inclined to develop diseases and pests. However, the problem commonly arises for people growing these in the Southern area rather than the north. From flea beetles to stem rot and white rust, sweet potato scurf and whiteflies endanger your beautiful plants.
There is also a particular insect called sweet potato weevils. They are a quarter of an inch long insect with dark blue heads and wings and a red-orange body that helps them camouflage with the vines. They often puncture the stems and tubers to lay eggs and have the tendency to ruin your harvest for you completely.
It is important to note here that these pesky pests like weevils multiply very fast and can be challenging to get rid of on your own. Hence, if you are confronted with such a situation, it is better to call up professional pest removal services or use a certified disease-resistant slip and dispose of the infected plants and roots in sealed containers with household trash.
Moreover, there is also a risk of fungus-like black rot causing dark depressions on the tubers. It is recommended to discard them immediately by removing them from the stem carefully so as not to ruin the whole vine. It is crucial not to confuse this fungus with a less serious disease, that is, scurf because the fungus has a greater chance of taking up your whole harvest.
Step 4: It’s Harvesting Time
The best way to know if it is the right time to harvest your sweet potatoes is to notice if the leaves have started to yellow. This is a crucial time frame because the longer you leave the crop in the ground, the higher your yield and vitamin count will be. However, on the flip side, if the frost blackens, your tubers can rot very quickly.
The second best way to just plainly harvest your sweet potatoes is to check if they are big enough for a meal. After all, if the lineup looks big and hearty, it is about time you remove it from the ground and have it settle in your kitchen before getting cooked up. You can also note the variety of sweet potatoes for the timing. 100 to 110 days are enough to harvest.
Here’s how you can get started on the harvesting:
- Loosen the soil around each plant individually.
- Do it carefully so as not to injure the root.
- Very carefully tread and cut away some of the vines.
- Pull up the primarily exposed crown of the plant and dig out the roots by hand.
- Sweet potatoes bruise easily, so be extra cautious.
- Shake off excess dirt as it is not the time to wash.
- Complete the harvesting by leaving the sweet potatoes to cure.
- Curing can be done in the kitchen, barn, or storage with high humidity for 10 to 14 days.
- You can also spread them on a table outside in a shady spot.
- Arrange the sweet potatoes, so they are not touching.
Step 5: Sweet Potato Fries to Brighten a Gloomy Day
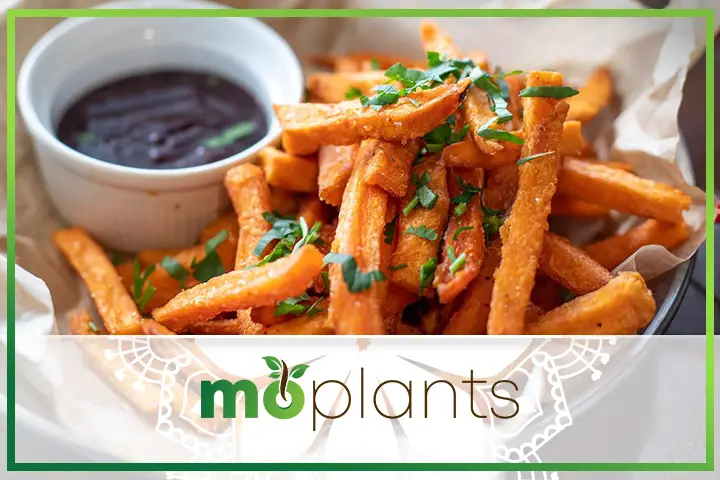
Now that you have your very own pantry full of homegrown deliciously sweet potatoes, why not celebrate your work with a hearty serving of sweet potato fries? One of the healthiest snacks or side items you can enjoy – that can be eaten on its own but pairs just as well with herbs, dips, and main course items like turkey, chicken, and meatloaf just the same.
For an even healthier induction, you can bake the fries instead of frying them or use an air fryer for the crunch. Sweet potato fries with truffles are something to die for. They are extremely delicious paired with a herb dip. Moreover, you don’t have to be guilty of finishing the whole plate by yourself.
Infographic
Wrap Up
Sweet potatoes are an extremely healthy, versatile, and definitely delicious root vegetable to include in your diet. The plant is beautiful to have in your home garden, but you can also enjoy a healthy supply of your own homegrown sweet potatoes in a matter of days. We hope that with the help of this guide, you can achieve a successful harvest of homegrown sweet potatoes. We suggest pairing up your sweet potato dishes with some kitchen garden planters – herbs like basil should do? Here is an in-depth guide on How to Grow and Care for Basil at your disposal.
