Starting a vegetable garden can be quite daunting, especially if you know nothing about soil, plants, and gardening.
However, once you learn the basics, you’ll find that it’s not only quite simple but also very rewarding—especially when you see the fresh vegetables on your dinner table.
If you’re interested in vegetable gardening for beginners, read through our guide below! We’ll tell you all you need to know for a successful and bountiful harvest.
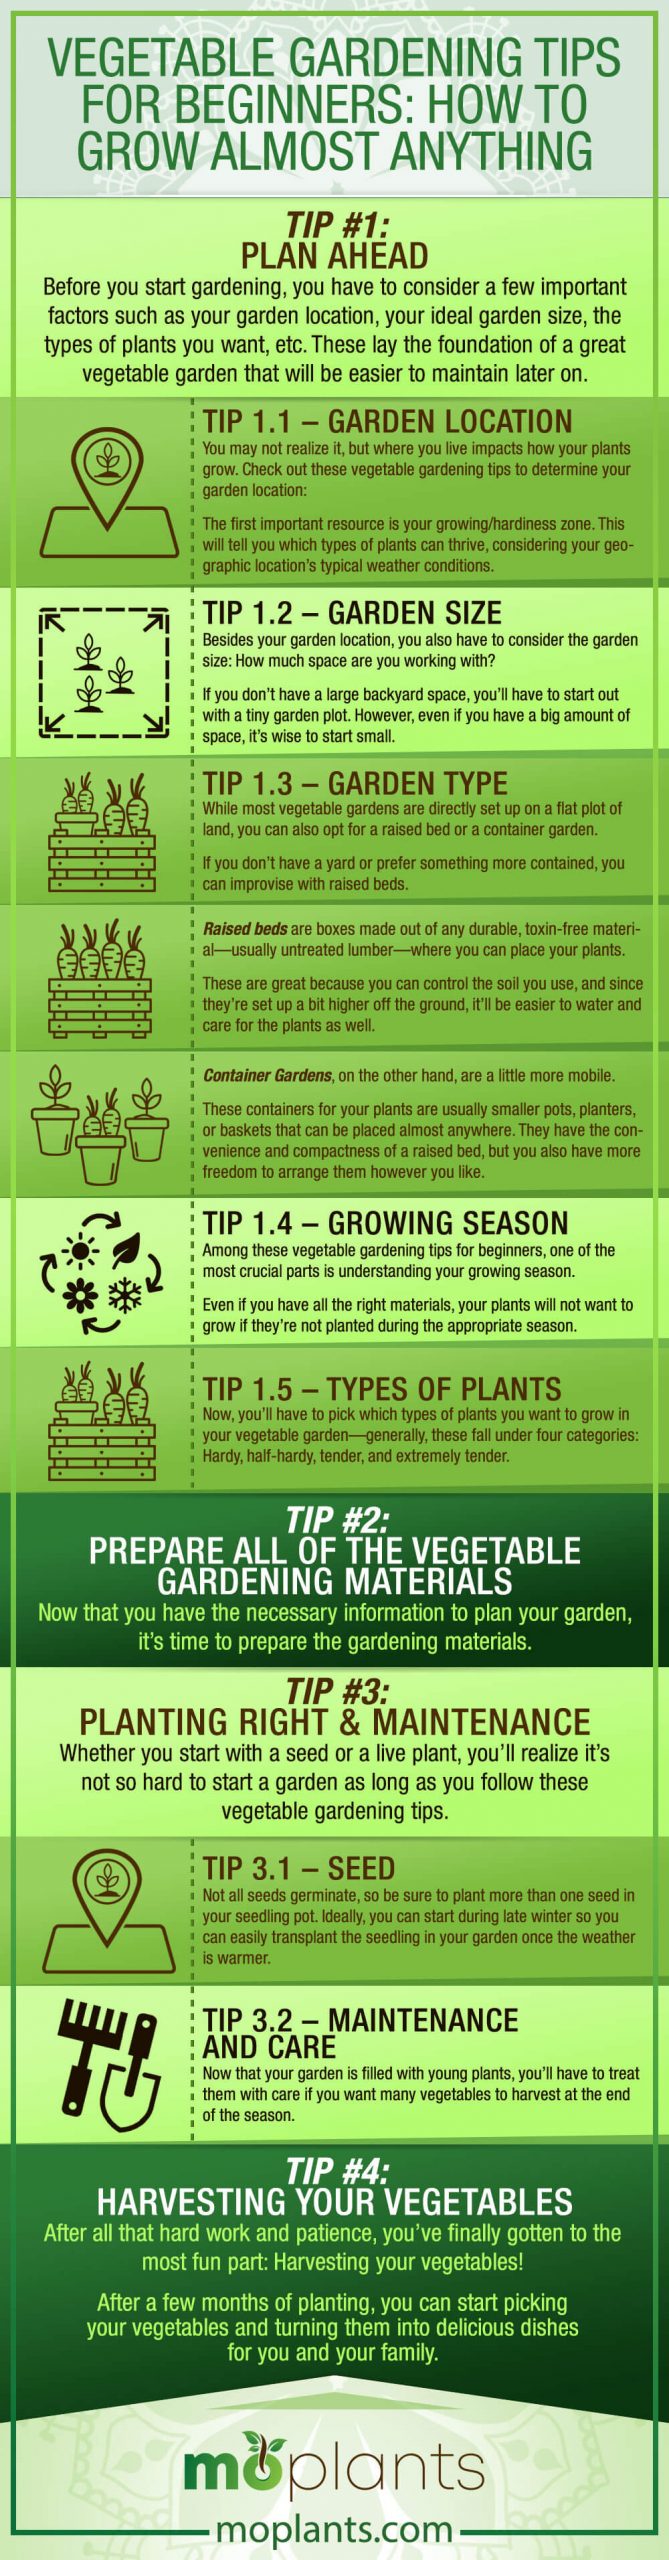
Tip# 1 – Plan Ahead
Before you start gardening, you have to consider a few important factors such as your garden location, your ideal garden size, the types of plants you want, etc. These lay the foundation of a great vegetable garden that will be easier to maintain later on.
Tip 1.1 – Garden Location
You may not realize it, but where you live impacts how your plants grow. Check out these vegetable gardening tips to determine your garden location:
The first important resource is your growing/hardiness zone. This will tell you which types of plants can thrive, considering your geographic location’s typical weather conditions.
While specific places will vary in humidity, heat, and natural soil moisture, this can serve as a general guide for gardeners in the United States.
Another vital factor is whether you reside in an urban or rural area. Rural areas usually have wide, open spaces and more sunlight exposure for the plants. Meanwhile, urban areas can be small and cramped. The presence of tall buildings and structures may also block natural light.
After all, the level of sunlight and/or shade that a plant has affects its survival, so you’ll want to make sure it’s situated in a place with the right amount it needs to grow.
Some plants may need direct and very bright sunlight, while others will thrive on indirect or filtered light. Most need at least 6 hours to produce.
It’s also helpful to have a water source near your garden—you’ll need this for regular maintenance later on.
If your potential garden location is not the most conducive for a specific type of vegetable, you may want to consider a different one, especially if you’re just starting out with gardening.
Tip 1.2 – Garden Size
Besides your garden location, you also have to consider the garden size: How much space are you working with?
If you don’t have a large backyard space, you’ll have to start out with a tiny garden plot. However, even if you have a big amount of space, it’s wise to start small.
When you’re a beginner wanting to grow vegetables in a new area, you’re going to have to gauge how all the variables—from the weather to your soil’s health—will affect them.
Not only is this harder to do when you have too many plants to keep track of, but you’ll also have a difficult time giving each one the sufficient care it needs to thrive. Consequently, you may end up with a poor harvest.
To determine the ideal garden size for you, plan a plot that’s realistically proportioned to your outdoor space. Think about how many vegetables you and your family will eat on average, so you’ll prevent food wastage in the future too.
Remember, you can always add on to your garden next time, so begin with a small space first while you’re still getting the hang of gardening.
These are not only helpful vegetable gardening tips for beginners; they’re also useful tips for more seasoned gardeners testing out plants given new variables in their area.
Tip 1.3 – Garden Type
While most vegetable gardens are directly set up on a flat plot of land, you can also opt for a raised bed or a container garden.
If you don’t have a yard or prefer something more contained, you can improvise with raised beds.
Raised beds are boxes made out of any durable, toxin-free material—usually untreated lumber—where you can place your plants.
These are great because you can control the soil you use, and since they’re set up a bit higher off the ground, it’ll be easier to water and care for the plants as well.
However, make sure the boxes are deep enough to contain a large amount of soil —around one to two feet—as roots can grow quite long.
It’s also important to have an effective drainage system in place to prevent waterlogged soil in your raised bed.
Container gardens, on the other hand, are a little more mobile.
These containers for your plants are usually smaller pots, planters, or baskets that can be placed almost anywhere. They have the convenience and compactness of a raised bed, but you also have more freedom to arrange them however you like.
Make sure you choose sturdy containers such as ones made from wood, concrete, and polyurethane foam; these can withstand changes in temperatures and keep your plants safe.
It’s less advisable to go with metals, terracotta, and brittle plastics. Like in a raised bed garden, your container garden should have drainage holes to remove excess water from the pot.
Tip 1.4 – Growing Season
Among these vegetable gardening tips for beginners, one of the most crucial parts is understanding your growing season.
Even if you have all the right materials, your plants will not want to grow if they’re not planted during the appropriate season.
What you can do is to check out the frost dates in your area. The first fall frost and the last spring frost are two important dates that affect your plants’ growth.
Generally, for fast-growing plants, you’ll want to avoid planting anything that won’t be harvested (or almost ready to harvest) before the first frost. Make sure you don’t start planting before the last frost as well since the lingering cold could still kill off your young plants.
Each plant’s growth rate will differ—some can be harvested more than once during a growing season, while others will take longer to bear fruit, so it’s best to be organized.
Make sure to keep track of these pieces of information when starting a vegetable garden.
Tip 1.5 – Types of Plants
Now, you’ll have to pick which types of plants you want to grow in your vegetable garden—generally, these fall under four categories: Hardy, half-hardy, tender, and extremely tender.
Hardy plants can survive in temperatures below freezing. This means that they can be planted in the garden even before the last frost.
Half-hardy plants can tolerate only light frosts, so they should be placed in the garden just right before the last frost.
Tender plants will be damaged by frost. These types of plants do well when planted after the last spring frost.
Extremely tender plants thrive in warmer temperatures. They shouldn’t be planted in the garden until at least three to four weeks have passed since the last signs of frost.
Since we’re tackling vegetable gardening tips for beginners, we’ll suggest some not-so-finicky plants that will still provide good harvests.
Salad Leaves
- Half-hardy plants
- Harvest every two to three weeks
Surprisingly, salad greens like spinach and lettuce are fantastic growers! They thrive under most conditions, but it’s best not to place them in an area that receives direct summer heat, as they can end up tasting bitter.
Ideally, you should sow the seeds in cool weather then harvest them young for the freshest taste.
If you live in a warmer climate, just make sure they’re in an area with sufficient shade from the full heat of the sun.
Potatoes
- Half-hardy plants
- Harvest in early summer
Potatoes will take a little longer time to grow, but your efforts will be well worth it. You can start planting these in early spring, just in time for a summer harvest.
Also, because potatoes are half-hardy plants, they can survive and continue producing below ground through the fall season.
Radishes
- Hardy plants
- Harvest after a month
Radishes are fast-growing plants that are perfect for any season! You can sow these in the spring then plant them again in the summer for a succession of bountiful harvests in one growing period.
Since you only need to wait around a month to harvest, you’ll have a lot of crunchy radishes for your salads throughout the year.
Beans
- Tender plants
- Harvest after two to three months
Both bush beans and pole beans are great additions to your garden, but take note that the latter comes from vines that can extend upwards of eight feet! You’ll have to find enough space and support for these plants to grow properly.
Since these are tender plants, it’s best to grow these in late spring so you can have a steady supply during summer.
Pole beans develop a little later than bush beans, but they’ll also produce a lot more. Both types of beans can also easily be canned for the winter months.
Peas
- Half-hardy plants
- Harvest after two to three months
Peas are plants that enjoy cooler weather. You can plant them in spring and enjoy the fresh harvest just two to three months after!
Although they don’t grow as high as pole beans, they’ll require some support for their stems. You can use chicken wire and netting for this. Remember not to place the plants under direct sunlight as well.
Garlic and Onions
- Hardy plants
- Harvest after two months
Garlic and onion plants are tough, quick-growing vegetables that add a lot of flavor to our meals.
They can be planted in both spring and fall for multiple harvests.
If you choose to plant during the fall, you’ll have to make sure they’re properly protected during winter. If successful, though, fall-planted bulbs usually produce greater yields than spring-planted bulbs.
Tomatoes
- Tender plants
- Harvest after five to six months
Tomatoes may seem like difficult vegetables to grow, but they’re actually quite simple to care for.
Since they’re tender plants, they don’t do well in the cold, but they’ll thrive easily in almost any other condition. Tomatoes also don’t require a lot of space in your garden.
If you give them adequate sunlight, water, and care, you’ll soon find yourself with plump and juicy tomatoes fresh off the vine!
Carrots
- Half-hardy plants
- Harvest after three months
Like some other vegetables on this list, carrots can be planted in both the spring and the fall. The cool weather will help them grow quickly and produce a great harvest!
While they can be harvested after three months, fall-planted carrots can be left in the ground during the winter as long as the ground doesn’t freeze too much,
Corn
- Tender plants
- Harvest after two to four months
With smaller yields, this crop takes up more space in your garden. However, if you’re willing to commit to it, you’ll get to eat sweet, homegrown corn after the harvest season!
As tender plants, corn should be sowed during the warmer months, but since it doesn’t take too long to grow, you’ll still be able to enjoy them throughout the summer months.
Summer Squash
- Extremely tender plants
- Harvest after two months
Summer squash also requires a larger starting space, but if you have the extra room, it’s a great choice.
These extremely tender plants are large and bushy, and they prefer the heat. Overly ripe squash plants tend to be hard, seedy, and flavorless, though, so harvest them frequently for the best results.
Companion Plants
Companion plants are crops that go well together—when grown near one another, they can intensify flavors, improve pest management, and attract pollinators.
Some popular combinations include radishes and carrots, lettuce and tomatoes/eggplants, as well as tomatoes and basil/cilantro.
Consider these tips when planning your garden for a better harvest!
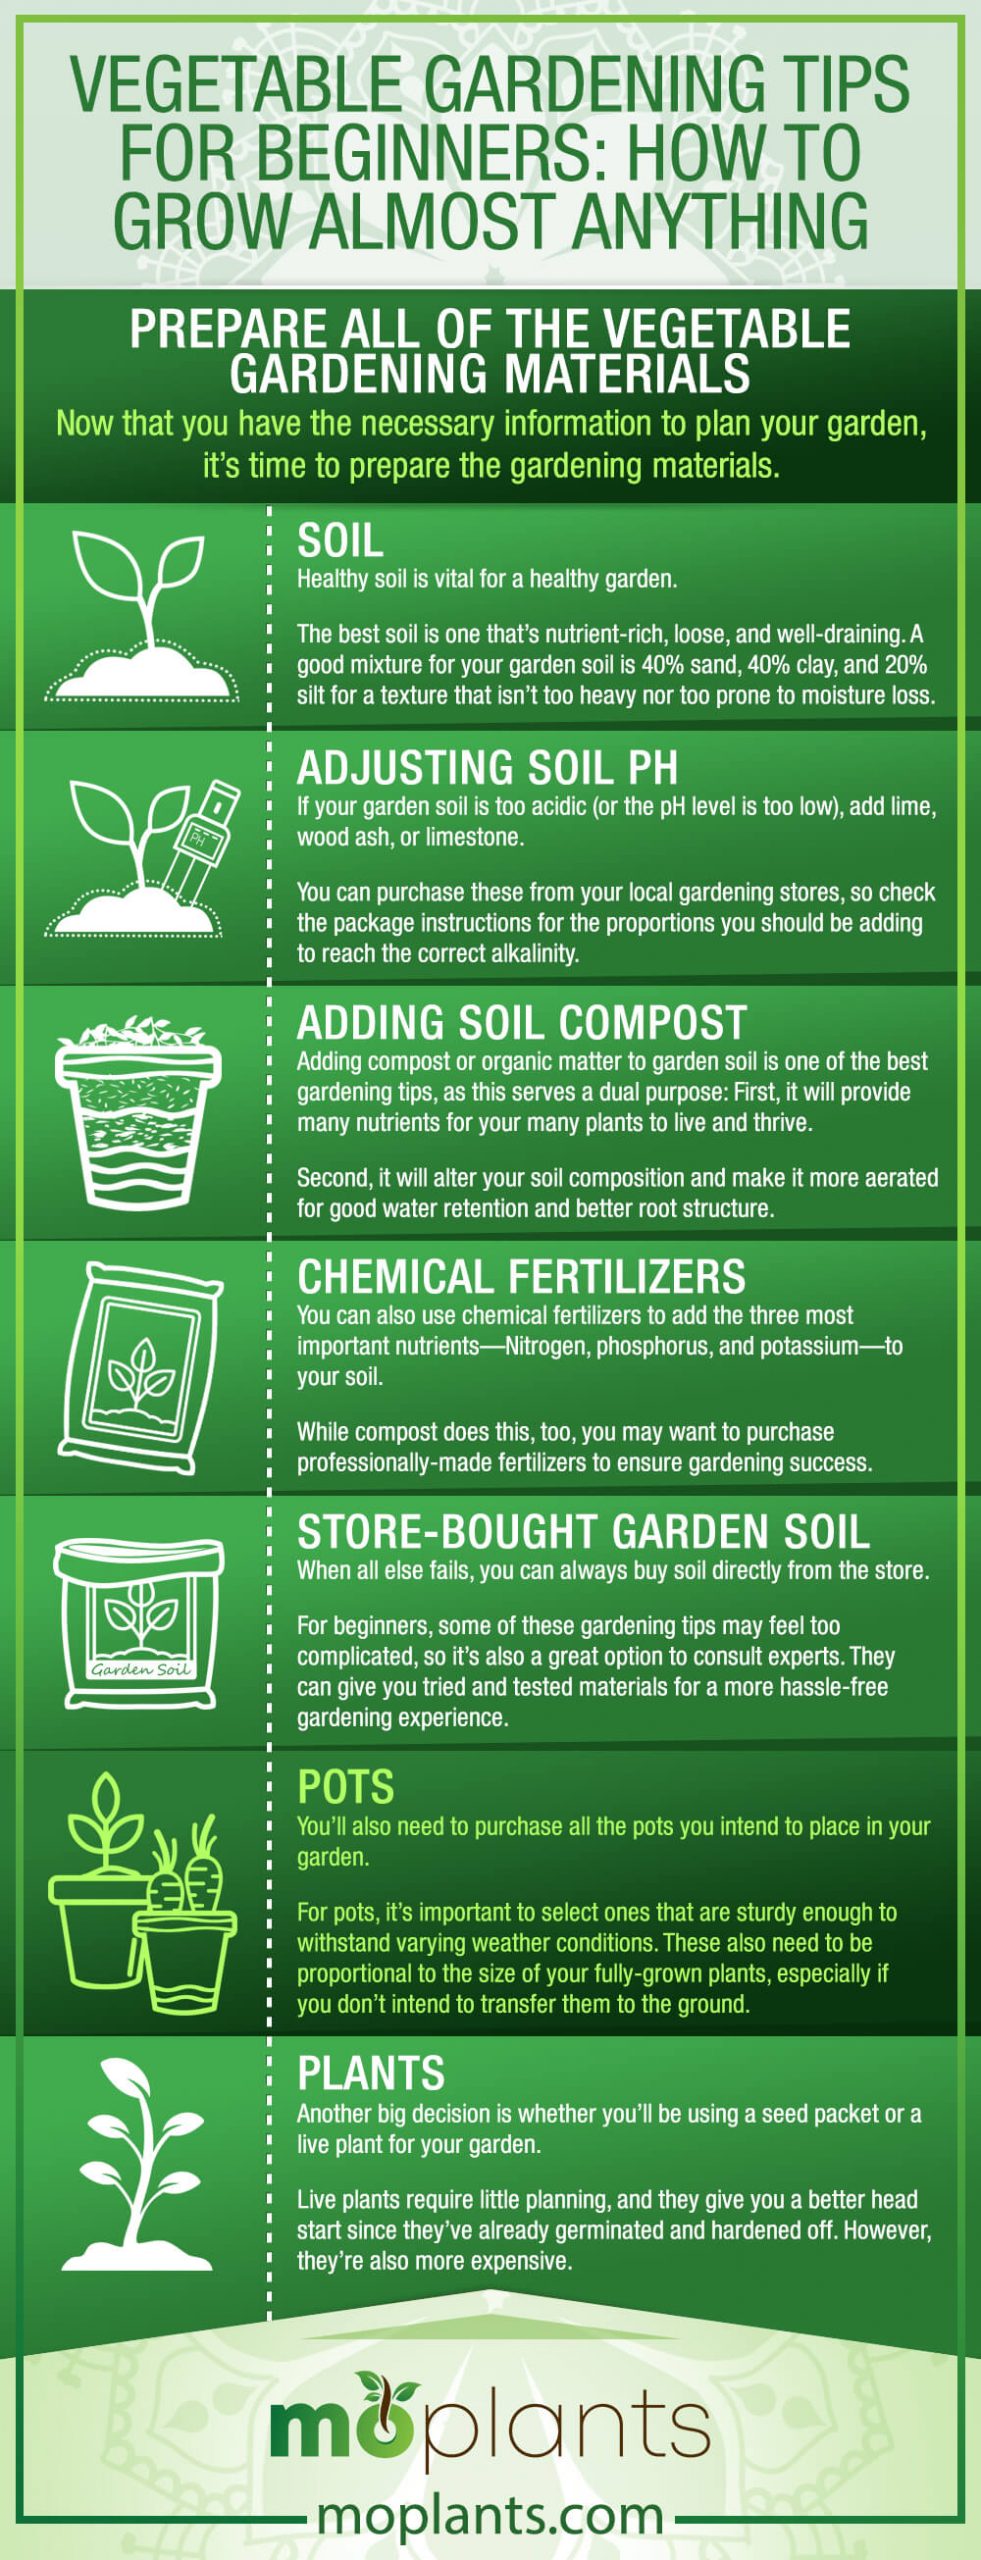
Tip #2 – Prepare All of the Vegetable Gardening Materials
Now that you have the necessary information to plan your garden, it’s time to prepare the gardening materials.
Tip 2.1 – Soil
Healthy soil is vital for a healthy garden.
The best soil is one that’s nutrient-rich, loose, and well-draining. A good mixture for your garden soil is 40% sand, 40% clay, and 20% silt for a texture that isn’t too heavy nor too prone to moisture loss.
If you’re working with soil you don’t know the composition of, you can perform something called the “Mason Jar Test” to figure it out.
What you’re looking for is loamy soil, which is characterized by clear water with layered sediments at the bottom of the jar and only fine particles on top.
One more thing to consider is the pH level of your garden soil. In general, a pH of 6.0-7.0 is ideal for mineral and nutrient absorption.
If the natural composition of your garden soil isn’t loamy or nutrient-dense, worry not! You can quickly amend this through the following methods:
Adjusting Soil PH
If your garden soil is too acidic (or the pH level is too low), add lime, wood ash, or limestone.
You can purchase these from your local gardening stores, so check the package instructions for the proportions you should be adding to reach the correct alkalinity.
On the other hand, for alkaline soil (or high pH levels), add aluminum sulfate. Again, verify the measurements with your local gardening store personnel.
These steps should be taken well before you start planting, as the soil needs time to adjust.
Adding Soil Compost
Adding compost or organic matter to garden soil is one of the best gardening tips, as this serves a dual purpose: First, it will provide many nutrients for your many plants to live and thrive.
Second, it will alter your soil composition and make it more aerated for good water retention and better root structure.
You can easily make compost for your garden by combining household waste, leaves, grass clippings, and any other decayed organic materials. You can also purchase ready-made compost from gardening stores.
Chemical Fertilizers
You can also use chemical fertilizers to add the three most important nutrients—Nitrogen, phosphorus, and potassium—to your soil.
While compost does this, too, you may want to purchase professionally-made fertilizers to ensure gardening success.
Store-Bought Garden Soil
When all else fails, you can always buy soil directly from the store.
For beginners, some of these gardening tips may feel too complicated, so it’s also a great option to consult experts. They can give you tried and tested materials for a more hassle-free gardening experience.
Pots
You’ll also need to purchase all the pots you intend to place in your garden.
For pots, it’s important to select ones that are sturdy enough to withstand varying weather conditions. These also need to be proportional to the size of your fully-grown plants, especially if you don’t intend to transfer them to the ground.
If you plan to move these around for decoration purposes, it’s best to choose more lightweight containers such as ones made from fiberglass blends.
Plants
Another big decision is whether you’ll be using a seed packet or a live plant for your garden.
Live plants require little planning, and they give you a better head start since they’ve already germinated and hardened off. However, they’re also more expensive.
Starting from seed is a little more tricky, but it’s very economical. You’ll also find that there are many more types you can experiment with for your garden versus the limited live plant options available in-store.
Be sure to purchase seeds from a trusted source to ensure successful germination.
Infographic
Tip# 3 – Planting Right & Maintenance
Whether you start with a seed or a live plant, you’ll realize it’s not so hard to start a garden as long as you follow these vegetable gardening tips.
Tip 3.1 – Seed
Not all seeds germinate, so be sure to plant more than one seed in your seedling pot. Ideally, you can start during late winter so you can easily transplant the seedling in your garden once the weather is warmer.
Materials Needed:
- Seed packet
- Seedling pots
- Seed-starting mix
- Water
- Organic/chemical fertilizer
- Shovel
Directions:
- Fill the seedling pot with a seed-starting mix (usually a combination of vermiculite and peat, as regular soil may expose the vulnerable seedling to disease). The pot should have drainage holes at the bottom since seeds can easily be over-watered.
- Sow the seeds of the same type in one pot. Plant only as deep as the directions suggest.
- Place the pots in a warm location and keep the soil moist until the seeds germinate.
- Once the seedlings emerge, move the pots to a bright location. It’s best to place them in a cool area that still receives light. Continue watering all throughout.
- When your plant has a few big leaves, you can begin fertilizing weekly.
- Once seedlings have two sets of leaves, snip them off to leave the strongest seedling in the pot.
- Proceed with the hardening off process: Gradually increase their exposure to all-day sunlight and decrease watering. However, protect them from intense weather conditions.
- After a week, you can transplant them to your garden.
Live Plant
For live plants, you can directly place them in your garden, as they’ve already finished the hardening off period. Make sure to dig a hole deep enough to accommodate its growing roots, and add compost all around the planting area before putting it in.
Once the plant is in your garden, you mustn’t forget to water it daily to catalyze photosynthesis.
Tip 3.2 – Maintenance and Care
Now that your garden is filled with young plants, you’ll have to treat them with care if you want many vegetables to harvest at the end of the season.
Sunlight
Adequate sunlight is an important part of the photosynthetic process.
In general, your plants must be able to receive at least 6 hours of sunlight for optimal growth. However, some types may thrive in the shade, so confirm this with your local gardening store before purchasing vegetable plants for your garden.
Watering
Consistent watering is also vital for the plant’s roots to take in all the necessary nutrients for growth.
Younger plants need more watering and attention compared to older plants with thicker, sturdier roots. Always direct the water towards the soil, not towards the plant’s leaves.
Fertilizing/Composting
Fertilizing or composting will provide extra nutrients and minerals for optimal growth. This is especially useful for newly-transplanted seedlings, as it will help them acclimate to the new environment.
Weeding
Weeding is a way to prevent damage to your plants.
It’s normal to have unwanted vegetation pop up while gardening, but these weeds may interfere with your vegetables’ growth. Pull them up regularly or use mulch to prevent weed germination.
Insecticides
Even when you follow all of these gardening tips, pests may still attack your many plants.
You can opt for either toxic or organic, non-toxic pesticides, but it’s important to note that the latter has a weaker formulation that will need to be applied more than once.
Definitely consult a gardening expert for extreme infestations, diseases, and other problems you may encounter with your plants.
Tip# 4 – Harvesting Your Vegetables
After all that hard work and patience, you’ve finally gotten to the most fun part: Harvesting your vegetables!
After a few months of planting, you can start picking your vegetables and turning them into delicious dishes for you and your family.
Every harvest season can bring about a different yield, so don’t be discouraged if a certain crop isn’t doing too well.
What you can do is keep a journal to track your process, plant updates, and performance so you can quickly adjust next time. After all, gardening involves a lot of experimenting with different variables too.
On the other hand, if you’ve been blessed by an abundant & bountiful harvest, and you’re producing more than you can eat, consider preserving them by freezing or canning.
Some vegetables such as tomatoes store beautifully canned, so you’ll always have fresh, yummy produce all year round.
Infographic
Final Thoughts
As you can see, vegetable gardening for beginners isn’t intimidating at all.
Now that you have everything you need to know to achieve gardening success, the next step is to go out and get started. The journey will definitely be a long one, but don’t forget to enjoy the process and have fun!
Good luck, and happy gardening!
